Assumed audience: Other software developers who have to manage the complexity of long-running upgrade branches.
Overview
When working with long-running projects (like difficult dependency upgrades), it’s helpful to land as many changes as possible on the main development branch instead of landing them all at once in a big bang. In at least some cases, we can accomplish this by making good use of the capabilities of distributed version control systems (DVCSs) like Git: clones, remotes, cherry-picking, and branches.
Motivation
Large software dependency upgrades — whether landing a new version of the dependency, or opting into new behavior by toggling feature flags — often involves making a lot of changes across an application. Perhaps there are formally breaking changes; perhaps your app was using private API; perhaps there are just subtle changes in the unspecified behavior of the app which you were incidentally relying on. Whatever the reason, it’s often the case that landing an upgrade against any sufficiently large code base is a long-running task which requires many changes to existing code.
There are two basic ways to make those kinds of changes:
- make all of them in a single long-lived branch, with the change at the root of that branch, and merge it all into the main development branch at the end
- make as many as possible in small changes against the main development, landing as few as possible alongside the upgrade
When I’m making these changes, I strongly favor the second approach for several reasons.
First, and most importantly, it minimizes the risk of the final merge breaking things and having to be reverted. If there are a lot of changes, even genuinely great test coverage won’t necessarily guarantee you’ve covered every scenario. Splitting out the changes makes it much easier to identify if it was the upgrade itself that caused little variations in behavior, or if it was another change you made along the way.
Second, it decreases the difficulty of keeping the branch up to date and working. This may not matter much if you’re the only one working on a project (though even there, everything above still applies). If you’re working with others, however, and they’re continuing to make changes to the same code base, keeping in sync becomes more difficult in proportion to the number of changes you’ve made and the rate of change in the code base at large. Every change someone else makes is a change you have to merge into your branch and verify again that nothing is broken. That’s hard enough if those are in the same modules you’re working with; it becomes even more complicated if they’re just in modules your changes interact with, where subtle misalignments can creep in over time.
For the rest of this post, I want to share a practical mechanic I use for actually accomplishing this (in Git, but you can apply the exact same ideas in Mercurial or other version control systems).
Implementation
The key to making this work well is taking advantage of modern distributed version control systems’ ability to have multiple full1 copies of the repository and that there is no absolute single source of truth (even if your organization, like most, tends to operate as though a particular copy is the source of truth).
Setup
First up, I create two clones of the repository. If these are long lived, I’ll often name them both for the name of the project, but with -alt tacked onto the end of one of them. For example, if I were working on a project named new-horizons,2 I’d have new-horizons and new-horizons-alt.3
Once I have both of them cloned, I take advantage of the fact that Git will happily let you have as many “remotes” as you like. A “remote” is just Git’s name for a copy of the repository that is somewhere else than the copy you’re working with. Most of the time, that remote is someplace like GitHub or GitLab or Bitbucket or some internal-to-our-company Git server. It doesn’t have to be, though. It can also be another copy on disk!
To add a remote, you use the command git remote add and then give it a path to the location of the repository and a name to use when referring to it. By default, wherever you initially clone the repository from is a remote named origin. You can rename remotes however you like, and names aren’t really all that important to Git. Branches will normally get set up to push and pull from whatever is the default remote (which you can configure), but even that you can override.
In this case, I start by cloning both from the same origin — it makes it way easier for later steps. Let’s say I was cloning new-horizons from a GitHub repository under my profile. I’d do this:
$ cd ~/dev/chriskrycho
$ git clone git@github:chriskrycho/new-horizons
$ git clone git@github:chriskrycho/new-horizons new-horizons-alt
That second clone is just repeating the first one, but putting it in the new-horizons-alt directory.
Once I have both clones, I’ll add each as a remote to the other:4
$ cd new-horizons
$ git remote add alt ../new-horizons-alt
$ cd ../new-horizons-alt
$ git remote add local ../new-horizons
Now, if I list the remotes in either using git remote --verbose, I’ll see origin listed, but also the other local copy! Assuming I’m in ~/dev/chriskrycho/new-horizons:
$ git remote --verbose
alt	../new-horizons-alt/ (fetch)
alt	../new-horizons-alt/ (push)
origin	git@github.com:chriskrycho/new-horizons.git (fetch)
origin	git@github.com:chriskrycho/new-horizons.git (push)
Once I have both clones in place, I keep one of them tracking the main development branch and the other a branch for the long-running task I’m working on. (Usually I will track the main development branch in the -alt clone, but it doesn’t actually matter, just as long as you know which is which.) For the sake of discussion, I’ll refer to the main development branch as master and the task branch as pluto for the rest of the post.
Workflow
The next step is to actually make progress on the upgrade or other long-running task! From here on out I’ll both describe what I do and show the result in terms of the graph of Git commits that result.
Initially, both new-horizons and new-horizons-alt with the same Git commit graph. It looks like this:

Then I create a new branch named pluto on the main clone (new-horizons):5
$ git branch --create pluto
The result is identical, except that I now have a working branch:

plutoI start by adding the baseline for the large change — upgrading the dependency:

plutoThen I get the test suite running against that change, and identify a failure in the test suite and start working on fixing it.6 Once I have a fix done, I commit it on the pluto branch in that clone:

plutoNow I need a way to apply that change back to the other copy of the repository, but without the upgrade. For this, I use the git cherry-pick command, which lets you take a single commit or a range of commit from another part of Git history and apply it to the current state of your repository.
In the new-horizons-alt repo — usually in another terminal view that I have open in parallel — I apply the change, without the upgrade fix in place. I do this in four steps:
-
Update to the latest
masterfromorigin, so that I can minimize the possibility of merge or rebase conflicts.$ git pull # or git pull origin/master -
Fetch my updates from
new-horizons. So, innew-horizons-alt:$ git fetch local -
Create a branch for the one single change I just made in
new-horizons.git branch --create some-pluto-fix -
Grab the top-most commit from the
plutobranch onlocal, using Git’scherry-pickcommand:git cherry-pick local/plutoThis will grab just the commit at the very tip of
plutoinnew-horizonsand apply it as a single commit on thesome-pluto-fixbranch innew-horizons-alt.
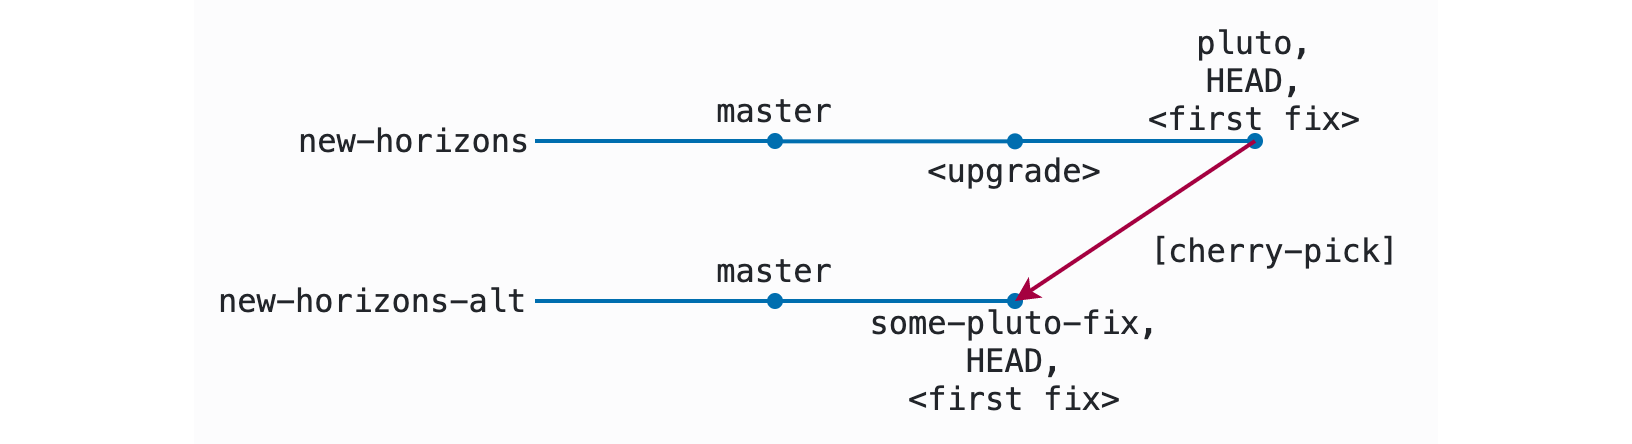
Now pluto in the new-horizons clone has the upgrade and a fix in place, while some-pluto-fix in the new-horizons-alt clone has just the fix in place.
I can run the test suite again in this copy of the code and make sure that my change works the way I expect it to without the upgrade in place. If it doesn’t, I keep working on it till my implementation does work in both the pluto and some-pluto-fix branches.7 Then I put it up for review and land it in the master branch of the codebase!
Once it lands on master, I update both repositories. In new-horizons-alt, this just means checking out master and pulling:
$ git checkout master
$ git pull
In new-horizons, it means updating both master and pluto — by pulling the commits into each, with a rebase for pluto:
$ git checkout master
$ git pull
$ git checkout pluto
$ git pull --rebase origin master
Doing the pull on master in both clones will get it up to date with the fix I landed now that it has been merged. Doing the pull --rebase on pluto in the new-horizons clone also gets it up to date — but that’s a more significant change for that branch. In this case, it looks at the difference between pluto and how master looks on origin, and re-applies any changes that aren’t present on pluto. Since the exact same patch corresponding to the fix previously at the tip of pluto is now in the history of master, Git drops it from the tip of the pluto branch, leaving me with just one commit on pluto ahead of master: the upgrade.8 Here’s what we have on the two branches now:

Note that the commit representing the upgrade — the tip of pluto — now has a new SHA value, because commit hashes don’t just represent the set of the changes included in that commit (i.e. the patch) but also the history to which the patch was applied. If you apply the same patch to two different histories, you’ll always get two different hashes. Even though the SHA values for the fix were different, though, Git can recognize that the patches applied were the same, and drop the now-unnecessary commit.
Depending on the merge strategy used, there’s one additional step to do back in new-horizons-alt: clean up the some-pluto-fix branch. If the commit was merged in a way that preserved its original hashes — that is, by a merge (fast-forward or not), and not by cherry-picking or rebasing — then you can just delete the branches, because Git will recognize that they are already part of master.
If it was cherry-picked or rebased, though, it will have a new commit hash. Git is smart enough to drop identical patches from a branch (which is how pluto ended up with the right shape above), but it is not smart enough to recognize that identical patches on different branches means the branches have been merged. In that case, I would need to force delete the branch: Git protects us from deleting branches that haven’t been merged by default, since that’s often a mistake.
# the long form
$ git branch --delete --force some-pluto-fix
# the short form
$ git branch -D some-pluto-fix
That’s the whole workflow! From this point forward, I just repeat until the upgrade is done: adding commits that fix bugs onto pluto in new-horizons, fetching into new-horizons-alt and cherry-picking those fixes into their own individual branches, landing them, and rebasing.
Efficiency
You might be thinking that constantly bouncing back and forth like this could get old. You would be right! In practice, I often work in a slight variation on the above approach, which makes it much more efficient.
Instead of landing changes one commit at a time, I will land a series of discrete fixes on the pluto branch, and then cherry-pick each of them into their own branches and pull requests for review once I have stocked up a series of them. This is especially helpful when I am in a flow state: I can just keep landing fixes until I run out of steam, and then switch to the more mechanical work of pulling them into branches and creating pull requests.
Here’s how that works. Everything starts the same as in the previous flow: with the upgrade sitting on top of master in the pluto branch in new-horizons:
Now, instead of fixing just one bug before switching back over, I fix several in a row — but each in a discrete commit. For convenience, I’ll refer to these as A, B, and C; in reality these would be Git SHA values. Here, the pluto branch contains A, then B, then C.

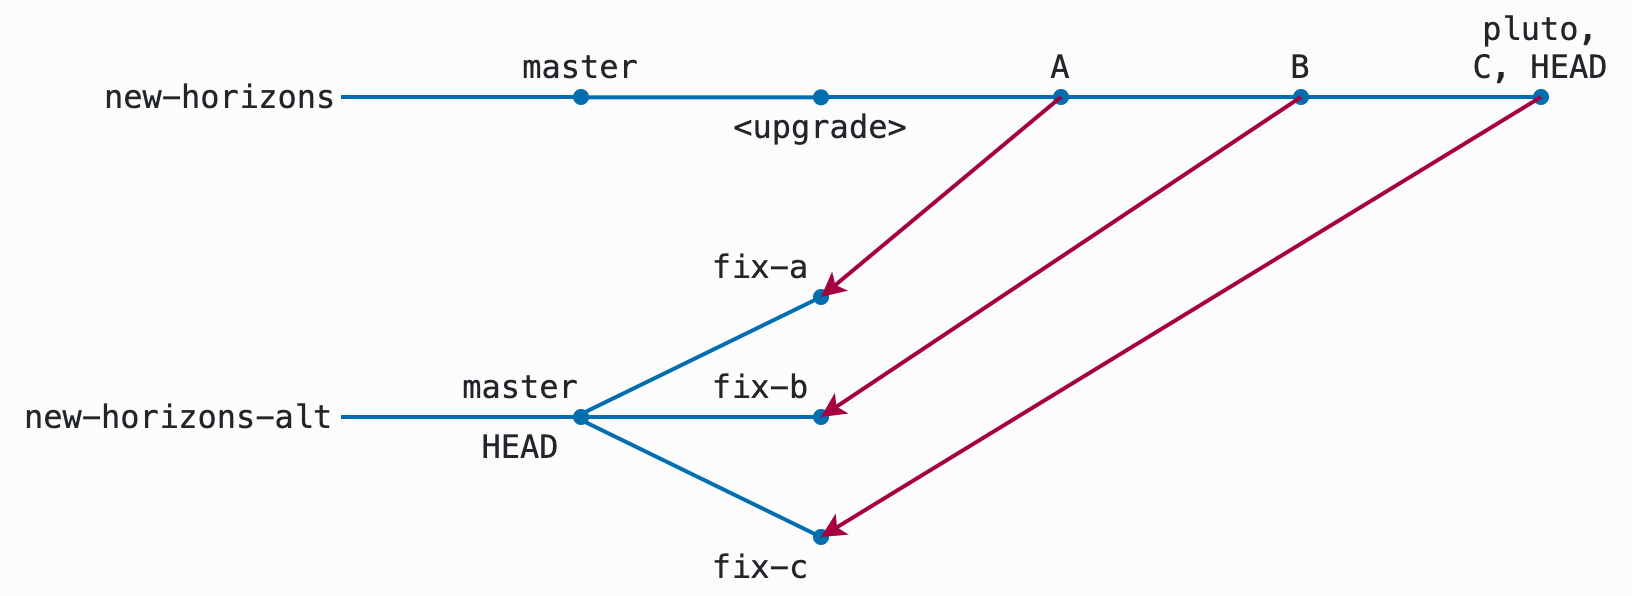
plutoKeeping them in discrete commits like this means I can cherry-pick them individually into their own branches. Switching back to new-horizon-alt, I create fix-a, fix-b, and fix-c branches from master, and cherry-pick the corresponding commits onto them: fix-a only has A, fix-b only has B, and fix-c only has C:
Each of these will merge in its own time, after being reviewed and passing tests on CI. Once the commits are merged, I’ll update to the current master on new-horizons-alt, just as before:
$ git checkout master
$ git pull
Now master contains all of the changes I made. They’re not necessarily in the same order they were in the original upgrade branch that I cherry-picked them from — but that’s fine. After all, that’s exactly why they were broken out into discrete commits! The commit graph might end up being the previous HEAD on master, then C, then A, then B — the order will just be whatever order they happened to land it:

masterAt this point, master contains all the fixes I made on pluto in the new-horizons branch. I can now rebase so once again my working copy only contains the upgrade commit on top of master.
$ git pull --rebase origin master
Now, my commit graph for pluto is once again just master with one extra commit, the upgrade, all sitting on top of the changes I made in A, B, and C:

A, B, and C.Finally, I clean up the branches I created for the fixes.
# the long form
$ git branch --delete fix-a fix-b fix-c
# the short form
$ git branch -d fix-a fix-b fix-c
And that’s it! Then I start again — and repeat until it’s done.
Conclusion
In general, it’s really helpful to avoid getting into the situation where this kind of thing is required in the first place —
- have your test suite run against every canary, beta, and stable release of your dependencies, and file bugs internally or upstream. F
- figure out how to land even large, sweeping changes behind feature flags
- land features incrementally instead of needing to do a lot of fixing up and rebasing
— but sometimes this kind of thing is out of your control, as it was out of mine last year. I hope if you find yourselves in the same spot I found myself last August, you now have a good handle on some of the ways you can manage this kind of large, long-running task effectively!
Two addenda:
-
Since writing this, I learned about git worktrees. I haven’t yet had a chance to try them out in this workflow, but they’re tailored for exactly this sort of thing, and the next time I’m doing this work, I’ll try them out and see if they’re an improvement on the multiple-branches approach I used here.
-
There has been some interesting discussion about switching away from the use of
masteras the name of the main development branch for projects like this, due to its associations with slavery (from which the terms “master” and “slave,” with all their very wretched history). For good or for ill,masteris the traditional name, and I’ve left it as that in this discussion. However, you easily could — and very possibly should! — substitutemainthroughout wherever the samples havemaster. I’ve left it this way here largely to make this post as easy as possible to find via web search.
Notes
or partial, if you like: Git’s sparse checkouts are super neat! ↩︎
Space nerds unite! The New Horizons mission was just so good! ↩︎
I habitually locate all my repositories in a folder named after the organization that owns them (whatever their hosting), inside my
~/devfolder. For example, the ember-cli-typescript repo lives at~/dev/typed-ember/ember-cli-typescript. So ifnew-horizonswere a LinkedIn project, these would live in~/dev/linkedin/new-horizonsand~/dev/linkedin/new-horizons-alt. ↩︎When working in a pull-request-oriented flow for open-source software development, I often name the “central” remote
upstreamand my own forkorigin. This workflow is a little different from that, as will become clear. ↩︎I’m using the
git branch --createcommand introduced in Git 2.23. If using an earlier version of Git, you can use the commandgit checkout --branch, which accomplishes the same thing but was a bit more confusing. ↩︎This whole strategy hinges entirely on having a useful test suite. If you don’t have reasonably good test coverage, good luck making large changes of any kind to an app of any size without breaking things. ↩︎
Rarely, there are times when I hit a thing I can’t fix safely against both
masterandpluto. In those cases, I don’t try to cherry-pick it over as described here. I emphasize, though, that this is genuinely very rare in most cases. ↩︎I could also do
git rebase master, but I tend to do apull --rebaseagainst the upstream because I work in fast-moving repositories and this way I don’t have to keep my localmasterup to date. I can if it’s helpful… but only if it’s ↩︎